
How to setup VMFleet to stress test your Storage Spaces Direct deployment
As an outcome of the Microsoft’s demos about Storage Spaces Direct at Ignite conference and the Intel Developer Forum, Microsoft published recently a bunch of PowerShell Script known as VMFleet
VMFleet is a basically a collection of PowerShell script to easily create a bunch of VMs and run some stress tests in it (mostly with the DISKSPD tool) to test the performance of an underlying Storage Space Direct deployment or simply for demonstration purposes.
After you have downloaded the files it is not quite obviously how to get started as the included documentation does not give you some simple step by step guidelines how to get all up and running.
So I decided to write my own short guide with the needed steps to get the VMFleet up and running.
Update 03.01.2017: Since I wrote this post in May 2016, Microsoft has apparently extended the VMFleet with some new scripts to setup the environment. So I updated the setup steps below. Thanks to my colleague and coworker Patrick Mutzner for pointing that out!
Prerequisites
- VMFleet Files from GitHub: https://github.com/Microsoft/diskspd
- diskspd.exe which is available at http://aka.ms/diskspd
-
A VHDX file with installed Windows Server 2012 R2 / 2016 Core and the password of the local Administrator account set. (sysprep must not be run!). A fixed VHDX file is recommended to eliminate “warmup” effects when starting the test runs.
Note: The VHDX should be at least 20GB big because the VMFleet Scripts will create a load test file of 10GB by default.
- A functional Storage Spaces Direct Cluster (with existing Storage Pool and no configured Virtual Disks)
VMFleet Setup
-
First you need to create one Volume/CSV per node to store the test VMs.
Get-ClusterNode |% { New-Volume -StoragePoolFriendlyName "S2D*" -FriendlyName $_ -FileSystem CSVFS_ReFS -StorageTierfriendlyNames Performance,Capacity -StorageTierSizes 1TB , 200GB } -
Then create an additional CSV to store the VMFleet scripts and for the collection of the test results from the VMs.
New-Volume -StoragePoolFriendlyName "*s2d*" -FriendlyName collect -FileSystem CSVFS_ReFS -StorageTierFriendlyNames Capacity -StorageTierSizes 1TB -
Extract the ZIP file with the VMFleet scripts on one of the cluster nodes. (For example extract the downloaded ZIP file to C:\Source on the first cluster node)
-
Run the install-vmfleet.ps1 Script. This will create the needed folder structure on the collect CSV. (The volume created at Step 2)
install-vmfleet.ps1 -source C:\Source - Copy the DISKSPD.exe to C:\ClusterStorage\Collect\Control\Tools
ProTip: Everything in this folder will later automatically be copied into every test VM. So you can also copy other files to this folder if you need them later inside the test VMs.
-
Copy template VHDX to C:\ClusterStorage\Collect
-
Run the update-csv.ps1 (unter C:\ClusterStorage\Collect\Control) script to rename the mountpoints of the CSV volumes and to distribute the CSV even in the cluster so every node is the owner node of exactly one CSV.

-
Now it’s time to create a bunch of test VMs on the four CSVs. This is done by the create-vmfleet.ps1 Script.
create-vmfleet.ps1 -basevhd 'C:\ClusterStorage\Collect\FleetImage.vhdx' -vms 10 -adminpass P@55w0rd! -connectuser HostAdmin -connectpass HostAdminPassAs parameters you must specify the path to the template VHDX file, how many VM per Node you like to create, the Administrator password of the template VHDX and a Username and its Password which has access to the Cluster Nodes (HostAdmin in this example). This account will be used inside the VMs to connect back to the cluster so that the script running inside the VMs get access to the collect CSV (C:\ClusterStorage\collect).
- Because the create-vmfleet.ps1 creates the VMs with the default values from the New-VM Cmdlet you should run now the set-vmfleet.ps1 Script to change the count of vCPUs and the memory size of the test VMs to your desired values.
set-vmfleet.ps1 -ProcessorCount 2 -MemoryStartupBytes 4GB -MemoryMinimumBytes 4GB -MemoryMaximumBytes 4GB -
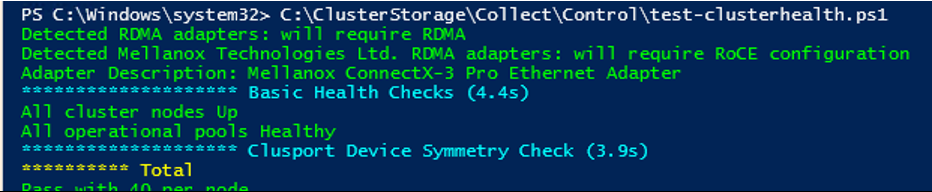
(Optional) Now before you begin with the tests you can check your Storage Spaces Direct Cluster configuration with the test-clusterhealth.ps1 script. The Script will check on all nodes if there are any RDMA configuration errors and it will do some basic health checks of the Storage Spaces Direct setup.
-
As the last preparation step start the watch-cluster.ps1 script. This will give you a nice dashboard like overview of the most interesting storage performance counters across all nodes in the cluster. So you get an overview of the storage load and performance.

- At this Point you are ready to start you first test run. Simply start all test VMs manually or with the start-vmfleet.ps1 script. After the VMs have booted up they will automatically look for the run.ps1 script on the collect CSV (at C:\ClusterStorage\Collect\Control). But by default the test run is in paused state. So to start the actual load test simply run the clear-pause.ps1 script. This will kick off the dskspd.exe in every VMs and you can observe how the numbers from the watch-cluster.ps1 will explode 😉
To change the test pattern simply change the parameters in the run.ps1 Script and either restart all test VMs (with stop-vmfleet.ps1 and start-vmfleet.ps1 scripts) or pause and resume the tests with the set-pause.ps1 and clear-pause.ps1 scripts. That’s it. VMFleet is ready. So have fun while testing your S2D deployment and while looking at some awesome IOPS numbers. 😊


Leave a comment